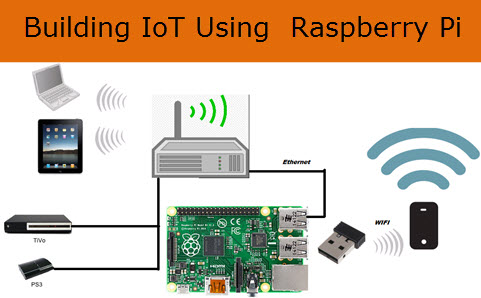
In the world of IoT, connectivity is king. The ability to control, monitor, and interact with your devices from anywhere has become not just a luxury but a necessity for many tech enthusiasts and professionals. Raspberry Pi devices, with their versatility and affordability, are at the heart of countless innovative IoT projects. However, when your Raspberry Pi is tucked away behind a router, things can get complicated.
Most routers are designed to protect your network, which is great for security but not so much for accessibility. This often creates a hurdle for those looking to access their Raspberry Pi remotely, especially if you're looking for free solutions. But don't despair! Unlocking the best remote IoT behind router Raspberry Pi for free is not only possible but also a lot simpler than most people think.
This comprehensive guide will explore the best practices, tools, and configurations to help you set up a remote IoT system behind your router using Raspberry Pi. Whether you’re a tech enthusiast, a DIY wizard, or just someone looking to save some cash, this setup is your golden ticket to a smarter life. We’ll break it down step by step so even beginners can follow along.
Why Remote IoT Behind a Router Matters for Raspberry Pi
With the increasing popularity of remote IoT solutions, managing Raspberry Pi devices behind routers has become common for tech enthusiasts and professionals. Imagine having a home automation system powered by a Raspberry Pi, or a remote sensor network collecting data in a distant location. Without remote access, you'd constantly need physical access to tweak settings, retrieve data, or troubleshoot issues. This is where the power of remote IoT truly shines.
Your router acts as a gatekeeper, protecting your internal network from external threats. While this is essential for cybersecurity, it also means that direct incoming connections to your Raspberry Pi are blocked by default. Overcoming this barrier allows you to:
- Monitor Projects Remotely: Check sensor readings, camera feeds, or system statuses from anywhere in the world.
- Control Devices: Turn lights on/off, adjust thermostats, or trigger actions on your Pi-powered devices even when you're away.
- Perform Maintenance: Update software, troubleshoot issues, or modify code on your Raspberry Pi without needing to be physically present.
- Save Costs: Avoid expensive cloud services by self-hosting your IoT infrastructure.
The best remote IoT behind router with Raspberry Pi offers a complete solution to improve your IoT operations, giving you unparalleled control and flexibility.
Understanding the Core Concepts
Before we dive into the setup, let's clarify a few fundamental concepts that are crucial for successful remote access.
Introduction to IoT and Raspberry Pi
IoT (Internet of Things): Refers to the network of physical objects embedded with sensors, software, and other technologies for the purpose of connecting and exchanging data with other devices and systems over the internet. From smart home devices to industrial sensors, IoT is transforming how we interact with the physical world.
Raspberry Pi: A series of small single-board computers developed in the United Kingdom by the Raspberry Pi Foundation to promote the teaching of basic computer science in schools and developing countries. Despite its educational origins, the Raspberry Pi has become incredibly popular among hobbyists and professionals for a vast array of projects, including robotics, media centers, and, most notably, IoT applications, due to its low cost, small size, and robust community support.
The Router's Role and Network Address Translation (NAT)
Your router is the central hub of your home or office network, connecting all your devices (computers, smartphones, smart TVs, and your Raspberry Pi) to the internet. It performs a crucial function called Network Address Translation (NAT). NAT allows multiple devices on your private network to share a single public IP address provided by your Internet Service Provider (ISP).
When you browse the internet, your router translates your internal device's private IP address to its public IP address before sending the request out. When data comes back, it translates the public IP back to the correct private IP for your device. This process, while efficient for outgoing traffic, inherently blocks unsolicited incoming connections from the internet to your internal devices, including your Raspberry Pi. This is why directly accessing your Raspberry Pi from outside your network is challenging.
How to Set Up Remote IoT Behind a Router with Raspberry Pi for Free
This comprehensive guide will walk you through the best methods and tactics for establishing a robust remote IoT setup. By following the steps outlined in this article, you can set up a powerful remote IoT system without spending a dime on expensive cloud services. Let's get started!
Step 1: Raspberry Pi Setup for Remote IoT
First, ensure your Raspberry Pi is ready for remote access. This involves installing an operating system and enabling necessary services.
- Install Raspberry Pi OS: Download the latest Raspberry Pi OS (formerly Raspbian) from the official Raspberry Pi website and flash it onto an SD card using a tool like Raspberry Pi Imager.
- Initial Setup: Boot your Raspberry Pi, complete the initial setup (country, language, password, Wi-Fi), and ensure it's connected to your local network.
- Enable SSH: SSH (Secure Shell) is the primary method for remote command-line access. To enable it:
- Via Raspberry Pi OS Desktop: Go to `Menu > Preferences > Raspberry Pi Configuration > Interfaces` tab and enable SSH.
- Via `raspi-config` (command line): Open a terminal and type `sudo raspi-config`. Navigate to `Interface Options > SSH` and enable it.
- For a headless setup (without monitor/keyboard): Before ejecting the SD card, create an empty file named `ssh` (no extension) in the boot directory of the SD card.
This is the core of how to set up remote SSH IoT behind a router with Raspberry Pi for free.
- (Optional) Enable VNC Server: If you prefer a graphical desktop interface, you can set up a VNC server on your Raspberry Pi.
- Install RealVNC Server: `sudo apt update && sudo apt install realvnc-vnc-server`
- Enable VNC: Go to `Menu > Preferences > Raspberry Pi Configuration > Interfaces` tab and enable VNC.
Users can set up a VNC server on a Raspberry Pi and use a VNC client application on a device of their choice (e.g., PC, smartphone) for graphical remote control.
- Find Your Pi's Local IP Address: In the terminal, type `hostname -I`. Note down the IP address (e.g., 192.168.1.100). You'll need this for port forwarding.
Step 2: Configuring Your Router for Remote Access
This is where we tell your router to allow specific incoming connections to your Raspberry Pi. From understanding your router’s role to configuring port forwarding and using DDNS, we’ve covered it all.
- Access Your Router's Administration Page: Open a web browser and type your router's IP address (often 192.168.1.1, 192.168.0.1, or 192.168.1.254). Log in with your router's username and password (check the sticker on your router or its manual).
- Set Up Port Forwarding: This is the most critical step. You need to tell your router to forward incoming traffic on a specific port to your Raspberry Pi's local IP address.
- Navigate to the "Port Forwarding," "Virtual Servers," or "NAT" section in your router's settings.
- Create a new rule:
- External Port (or Public Port): Choose a port you'll use to access your Pi from outside. For SSH, the default is 22. For security, it's recommended to use a different, non-standard port (e.g., 2222, 50000) to avoid common scanning attempts.
- Internal Port (or Private Port): This is the port your Raspberry Pi is listening on (e.g., 22 for SSH, 5900 for VNC).
- Internal IP Address: Enter your Raspberry Pi's local IP address (e.g., 192.168.1.100).
- Protocol: Select TCP (for both SSH and VNC).
- Save the rule.
- Set Up Dynamic DNS (DDNS): Your home's public IP address usually changes periodically (it's dynamic). This makes it hard to consistently connect to your Pi from outside. DDNS services solve this by linking a memorable hostname (e.g., `myiotpi.ddns.net`) to your dynamic IP.
- Sign up for a free DDNS service (e.g., No-IP.com, DuckDNS.org).
- Create a hostname within their service.
- Many modern routers have built-in DDNS clients. Look for a "DDNS" section in your router settings, select your provider, enter your hostname, username, and password.
- If your router doesn't support DDNS, you can install a DDNS update client directly on your Raspberry Pi (e.g., using `ddclient` for No-IP or a simple script for DuckDNS).
This ensures you can always connect to your Pi using the hostname, even if your public IP changes.
Step 3: Establishing Secure Remote Connections
Once your router is configured, you can connect to your Raspberry Pi from anywhere.
- SSH Connection:
- From a Linux/macOS terminal or Windows PowerShell: `ssh -p [External_Port] pi@[Your_DDNS_Hostname]` (e.g., `ssh -p 2222 pi@myiotpi.ddns.net`).
- If you used the default port 22: `ssh pi@[Your_DDNS_Hostname]`.
- Enter your Raspberry Pi's password when prompted.
- VNC Connection:
- Download and install a VNC client application (e.g., RealVNC Viewer) on your device.
- In the VNC client, enter your DDNS hostname followed by the external port if you changed it (e.g., `myiotpi.ddns.net:2222` if you forwarded external port 2222 to internal VNC port 5900). If you used the default VNC port (5900) and forwarded it directly, just the hostname might suffice.
- Enter your Raspberry Pi's username and password.
Step 4: Securing Your IoT Behind Router
Security is paramount for any device accessible from the internet. From configuring your Raspberry Pi to ensuring security and troubleshooting common issues, we've got you covered.
- Change Default Passwords: Immediately change the default 'pi' user password on your Raspberry Pi.
- Use SSH Key-Based Authentication: This is much more secure than passwords. Generate an SSH key pair on your client machine and copy the public key to your Raspberry Pi. Then disable password authentication for SSH.
- Use Non-Standard Ports: As mentioned, change the external port for SSH and VNC from their defaults (22 and 5900) to higher, less common port numbers.
- Keep Software Updated: Regularly update your Raspberry Pi's operating system and software: `sudo apt update && sudo apt full-upgrade`.
- Implement a Firewall on Pi: Use `ufw` (Uncomplicated Firewall) on your Raspberry Pi to allow only necessary incoming connections (e.g., from your specific external IP if possible, or just the forwarded ports).
- Router Firmware Updates: Keep your router's firmware updated to patch security vulnerabilities.
By taking these steps, you significantly enhance the security of your remote IoT setup.
Benefits of This Free Remote IoT Setup
The best remote IoT behind router with Raspberry Pi offers a complete solution to improve your IoT operations, and the benefits are clear:
- Cost-Effective: You achieve full remote access without spending a dime on expensive cloud services or subscriptions.
- Full Control: You have complete ownership and control over your data and devices, unlike relying on third-party cloud platforms.
- Flexibility: Customize your setup to your exact needs, integrating various sensors, actuators, and software.
- Learning Opportunity: It's a fantastic way to learn about networking, Linux, and IoT concepts hands-on.
The potential for remote IoT VPC SSH Raspberry Pi setups will only grow, and by mastering this free approach, you're future-proofing your skills and projects.
Troubleshooting Common Issues
Even with a comprehensive guide, you might encounter some hiccups. Here are a few common issues and their quick fixes:
- Cannot Connect via SSH/VNC:
- Double-check your Raspberry Pi's local IP address.
- Verify your router's port forwarding rules are correctly configured (internal/external ports, IP, protocol).
- Ensure your DDNS service is updating correctly and your hostname resolves to your current public IP.
- Check your Raspberry Pi's firewall (if enabled) to ensure it's not blocking connections.
- Slow Connection:
- Your internet's upload speed might be a bottleneck.
- Ensure your Raspberry Pi has a strong Wi-Fi signal or use an Ethernet connection.
- Router Settings Inaccessible:
- Try different common router IPs (192.168.1.1, 192.168.0.1).
- Ensure you're connected to your home network.
- If you forgot credentials, you might need to factory reset your router (which will clear all current settings, including port forwards!).
Conclusion
And there you have it—everything you need to know about setting up the best remote IoT behind router for Raspberry Pi free! We've covered the "Why," the "What," and the "How," providing a comprehensive guide to setting up the best remote IoT VPC SSH Raspberry Pi setup for free. From understanding your router’s role to configuring port forwarding and using DDNS, we’ve covered it all, ensuring you have the tools and knowledge to succeed.
By following the steps outlined in this article, you can set up a powerful remote IoT system without spending a dime on expensive cloud services. This setup empowers you to control your Raspberry Pi projects from anywhere in the world, offering unmatched flexibility and cost savings. The increasing popularity of remote IoT solutions means that managing Raspberry Pi devices behind routers has become common, and now you have the expertise to join this growing trend.
Whether you're a tech enthusiast, a DIY wizard, or just someone looking to save some cash, this setup is your golden ticket to a smarter life. The potential for remote IoT VPC SSH Raspberry Pi setups will only grow, and you're now equipped to harness its full power. Happy remote controlling!


Detail Author:
- Name : Thaddeus Luettgen
- Username : godfrey56
- Email : xhane@hotmail.com
- Birthdate : 1997-09-26
- Address : 279 Howell Plain North Lavernshire, NY 61585-3642
- Phone : 678-473-5073
- Company : Botsford-Ratke
- Job : Admin
- Bio : Et cum repellat saepe maiores rerum et. Id nihil voluptatem quisquam laborum sit. Eos a nesciunt vero nihil dolor. Provident alias cumque iste quo culpa cumque vitae.
Socials
linkedin:
- url : https://linkedin.com/in/elinor.ledner
- username : elinor.ledner
- bio : Aut quasi itaque modi aut sequi deleniti.
- followers : 3798
- following : 557
tiktok:
- url : https://tiktok.com/@elinor1729
- username : elinor1729
- bio : In officiis consequatur et vero magnam accusamus deserunt aut.
- followers : 1778
- following : 643
facebook:
- url : https://facebook.com/ledner1998
- username : ledner1998
- bio : Nobis sed iste modi molestiae.
- followers : 3307
- following : 2339
twitter:
- url : https://twitter.com/elinor.ledner
- username : elinor.ledner
- bio : Tenetur est omnis sed qui voluptatum vel quo minus. Inventore in iure et est ut corporis cumque. Dolore officia non necessitatibus incidunt sint ipsa.
- followers : 3487
- following : 1841
instagram:
- url : https://instagram.com/elinor.ledner
- username : elinor.ledner
- bio : Quo sit cum quo provident porro. Expedita omnis distinctio accusamus vel. Dolore est ut modi sed.
- followers : 3482
- following : 2966
