In today's interconnected world, the ability to control and monitor devices remotely is no longer a luxury but a growing necessity. From managing smart home appliances to overseeing industrial sensors, the Internet of Things (IoT) is transforming how we interact with our environment. At the heart of many innovative IoT projects lies the versatile and affordable Raspberry Pi. But here's the thing—getting the most out of your Raspberry Pi for remote IoT applications can be tricky, especially when your Pi resides behind that essential piece of network hardware: your router.
The router frequently acts as a formidable barrier, designed to protect your internal network from external threats. While crucial for security, this protective layer can make it challenging to access your Raspberry Pi from outside your home network. You want to make sure your setup is secure, efficient, and reliable. That’s where this comprehensive guide comes in. We’re going to break down everything you need to know to create the best remote IoT setup behind your router using Raspberry Pi, ensuring seamless connectivity and secure access.
Why Raspberry Pi for Remote IoT?
Before we dive into the technicalities, let's explore why the Raspberry Pi is the perfect choice for your remote IoT projects. Raspberry Pi is more than just a tiny computer—it’s a powerhouse for innovation.
- Affordability: Raspberry Pi models start at incredibly affordable prices, making them accessible for hobbyists and professionals alike. Setting up the best remote IoT behind router Raspberry Pi free system is a fantastic way to explore the world of IoT without spending a fortune.
- Versatility: With its GPIO pins, robust operating system (Raspberry Pi OS), and support for various programming languages, the Pi can be adapted for virtually any IoT application. It's a truly versatile platform for innovation.
- Community Support: A vast and active community means endless resources, tutorials, and troubleshooting assistance are readily available.
- Low Power Consumption: Ideal for always-on IoT applications, the Raspberry Pi consumes very little power, making it an energy-efficient choice.
Raspberry Pi continues to play a vital role in the evolution of IoT, offering an affordable and versatile platform for innovation.
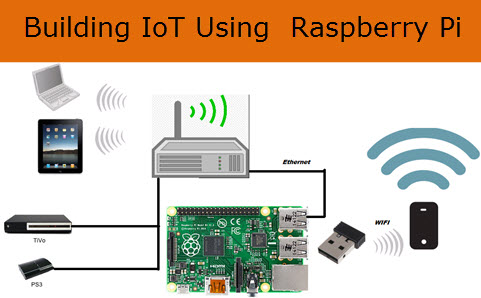
The Router Challenge: Understanding the Barrier
Setting up a Raspberry Pi for IoT isn’t as simple as plugging it in and hoping for the best, especially when remote access is involved. Your home router employs Network Address Translation (NAT) and a built-in firewall. This means that devices on your local network (like your Raspberry Pi) have private IP addresses that aren't directly accessible from the internet. The router acts as a gatekeeper, only allowing incoming connections that it explicitly expects or that you've configured it to permit.
Overcoming this "formidable barrier" requires careful planning and execution. This article provides a deep dive into the world of remote IoT solutions tailored for Raspberry Pi devices, specifically focusing on scenarios where your Pi resides behind a router. We'll dissect the best practices, explore the most effective tools and strategies, and guide you through the necessary configurations to ensure you can effortlessly manage your Pi from anywhere.
Essential Tools and Best Practices for Remote IoT
To create a secure, efficient, and reliable IoT system, you need the right approach. Here are the best remote IoT solutions and practices:
Secure Remote Access: SSH and Beyond
One of the most fundamental ways to access your Raspberry Pi remotely is via SSH (Secure Shell). How to set up remote SSH IoT behind a router with Raspberry Pi for free is a common question, and it's a great starting point.
- SSH Setup: Ensure SSH is enabled on your Raspberry Pi. This can be done via the Raspberry Pi Configuration tool or by creating an empty file named `ssh` in the boot directory of your SD card.
- SSH Key-Based Authentication: For enhanced security, always use SSH key-based authentication instead of passwords. This involves generating a pair of cryptographic keys (a public key on your Pi, a private key on your client device) and is significantly more secure than relying on passwords alone.
- Port Forwarding (Use with Caution): This involves configuring your router to direct incoming traffic on a specific port to your Raspberry Pi's local IP address and SSH port (default 22). While it works, it exposes your Pi directly to the internet, making it less secure. If you use this, change the default SSH port (e.g., to 2222) and ensure strong security measures are in place.
- Virtual Private Network (VPN): The Gold Standard for Security: Setting up a VPN server (like OpenVPN or WireGuard) on your Raspberry Pi or, ideally, directly on your router, is arguably the most secure method. When you connect to your home VPN, your remote device becomes part of your home network, allowing you to access your Pi as if you were physically at home, without exposing any ports directly to the internet. This is a best practice for security.
- Reverse SSH Tunneling: If you have access to an external server with a public IP address, you can establish a reverse SSH tunnel from your Pi to that server. This creates a secure tunnel through which you can then access your Pi from anywhere, without needing to configure port forwarding on your home router.
- Cloud-Based Remote Access Services: Services like Ngrok, Remote.it, or Dataplicity offer a simpler way to establish secure tunnels to your Pi without complex router configurations. Many of these services offer free tiers, making them excellent "free" options for getting started. They typically involve installing a client on your Pi that connects to their cloud servers, creating a secure, outbound connection that bypasses router restrictions.
Visual Control: VNC Server Setup
Sometimes, you need a graphical interface to manage your Raspberry Pi. That's where VNC (Virtual Network Computing) comes in. Users can set up a VNC server on a Raspberry Pi and use a VNC client application on a device of their choice (computer, tablet, smartphone). This allows you to see and interact with your Pi's desktop environment remotely. For VNC to work behind a router, you'll need to combine it with one of the secure remote access methods mentioned above (e.g., connect via VPN first, or tunnel VNC over SSH).
General Best Practices for Security and Reliability
Regardless of your chosen access method, these practices are crucial for a robust remote IoT setup:
- Strong, Unique Passwords: Never use default passwords. Use complex, unique passwords for your Pi and router.
- Regular Updates: Keep your Raspberry Pi OS and all installed software updated (`sudo apt update && sudo apt upgrade`). This ensures you have the latest security patches.
- Dedicated User Accounts: Avoid using the default 'pi' user for all tasks. Create separate user accounts with specific permissions for different IoT applications.
- Firewall Configuration: Enable and configure a firewall (like UFW - Uncomplicated Firewall) on your Raspberry Pi to restrict incoming and outgoing traffic to only what is necessary.
- Static Local IP Address: Assign a static IP address to your Raspberry Pi within your local network. This ensures its IP doesn't change, making it easier for your router to find it for port forwarding or VPN configurations.
- Reliable Power Supply: Invest in a good quality power supply for your Raspberry Pi to prevent data corruption and ensure stable operation, especially for always-on IoT applications.
Unleashing the Potential: What You Can Do
The possibilities with remote IoT behind a router using Raspberry Pi are virtually endless. With remote IoT behind a router powered by Raspberry Pi, you can control everything from your lights to your security cameras, all from the comfort of your couch or even from the other side of the globe.
- Smart Home Automation: Control smart devices like lights, thermostats, and security systems remotely. Imagine adjusting your home's temperature or turning off lights from your office.
- Remote Monitoring: Set up sensors to monitor environmental conditions (temperature, humidity, air quality) in your home or garden, and receive alerts on your phone.
- Security and Surveillance: Use a Raspberry Pi with a camera module to create a remote security camera system, allowing you to view live feeds from anywhere.
- Data Logging and Analysis: Collect data from various sensors over time, store it on your Pi, and analyze it remotely to gain insights.
- Personal Cloud Storage: Turn your Pi into a personal cloud server to access your files from anywhere.
With the right tools, knowledge, and a bit of creativity, you can create innovative solutions that enhance your daily life and explore the world of IoT without spending a fortune.
Setting Up Your Best Remote IoT System: A Step-by-Step Approach
Setting up the best remote IoT behind a router for Raspberry Pi requires careful planning and execution. While this article doesn't provide a line-by-line tutorial for every method, it outlines the conceptual steps:
- Choose Your Remote Access Method: Based on your security needs and technical comfort, decide whether you'll use a VPN, reverse SSH tunnel, or a cloud service. For maximum security, a VPN is highly recommended.
- Prepare Your Raspberry Pi: Install Raspberry Pi OS, enable SSH, set up SSH key-based authentication, update your system, and configure a static local IP.
- Implement Your Chosen Solution:
- If using a VPN: Install and configure OpenVPN or WireGuard on your Pi (or router).
- If using a cloud service: Install the client software on your Pi and follow the service's instructions.
- If using reverse SSH: Set up your external server and configure the tunnel.
- Configure Router (if necessary): Only if you're using port forwarding or setting up a VPN server directly on your router.
- Test Thoroughly: Access your Pi from outside your home network to ensure everything is working as expected. Test all IoT functionalities.
By following the guidelines outlined in this article, you can create a secure and efficient IoT system tailored to your needs. This article will help you navigate the best practices for running remote IoT behind a router, ensuring your setup is smooth, secure, and scalable. Whether you’re a tech enthusiast or just starting out, this guide will equip you with everything you need to know about the best remote IoT behind router solutions for Raspberry Pi.
Conclusion and Call to Action
In this guide, we’ve explored the best remote IoT solutions behind a router for Raspberry Pi. We've seen that while routers present a barrier, they are not insurmountable. By leveraging tools like SSH, VNC, and crucially, secure methods like VPNs or cloud-based tunneling services, you can achieve robust and reliable remote access to your Raspberry Pi. The Raspberry Pi's affordability, versatility, and strong community support make it an unparalleled platform for bringing your IoT ideas to life, allowing you to control devices and monitor systems from anywhere in the world.
Setting up the best remote IoT behind a router for Raspberry Pi is an empowering journey that opens up a world of possibilities for innovation and control. We encourage you to share your experiences and insights in the comments section below. What remote IoT projects have you built with your Raspberry Pi? What challenges did you face, and how did you overcome them?

Detail Author:
- Name : Kiara Kshlerin
- Username : marks.nedra
- Email : bashirian.lauretta@hotmail.com
- Birthdate : 1986-10-29
- Address : 28472 Elijah Passage Suite 554 South Clifton, VT 38274
- Phone : +1.737.521.0091
- Company : Schneider LLC
- Job : Electrotyper
- Bio : Eligendi corporis dolor occaecati dolores vero nulla. Iusto et accusantium aspernatur harum.
Socials
twitter:
- url : https://twitter.com/dframi
- username : dframi
- bio : Dolor ea facere ex possimus iusto quis. Omnis aliquam quia voluptatem facilis in eum molestiae. Quia fuga reprehenderit eaque sequi sunt.
- followers : 6218
- following : 2004
instagram:
- url : https://instagram.com/dario_xx
- username : dario_xx
- bio : Totam necessitatibus excepturi et eos. Omnis rerum ab est. Numquam eos quae et facere sed.
- followers : 993
- following : 1227
